Before You Create an Event
So you've signed up on Tixmore and you're ready to create your first event. Before you hit that "Create Event" button, there are a few account-level settings worth checking. These defaults apply to all your future events, so getting them right upfront saves you from fixing things later.
Think of it like setting up your kitchen before you start cooking — you want the right tools in place.
1. Currency & Timezone
Where: Settings → Basic
Your currency and timezone are the foundation for everything — ticket pricing, event schedules, sales reports, and payouts all depend on these two settings.
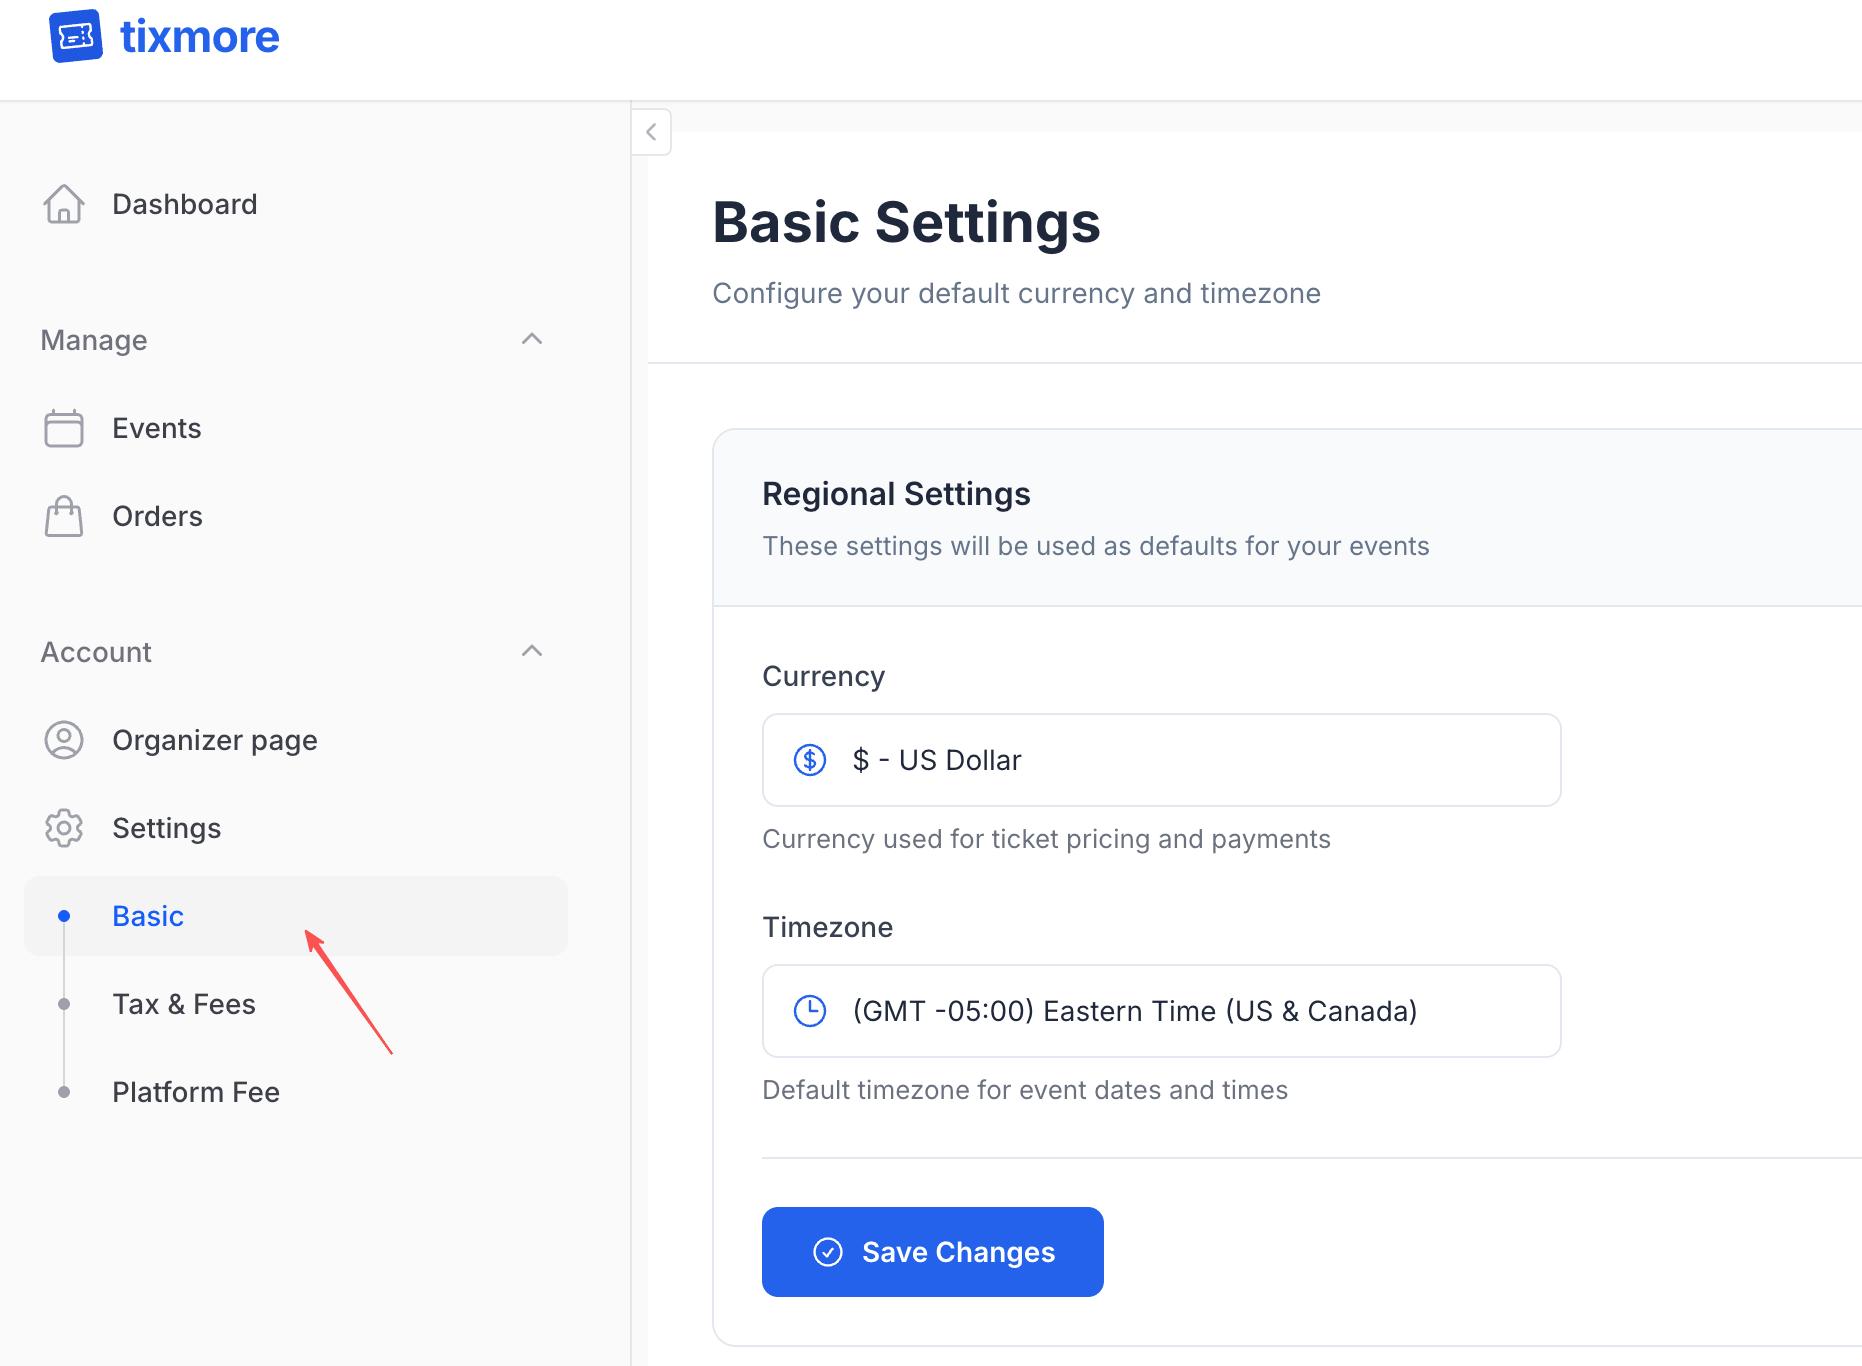
Currency
This is the currency used for all your ticket prices and financial transactions. Choose the currency that matches where your audience will be paying from. A few things to keep in mind:
- You can only set one currency per account. If you run events in different countries with different currencies, you'll need separate organizer accounts.
- Changing currency later won't convert existing ticket prices — you'd need to update them manually.
- Tixmore supports 10+ currencies including USD, EUR, GBP, CNY, JPY, HKD, SGD, AUD, CAD, TWD, and MYR.
Timezone
This affects how your event dates and times are displayed to attendees. If you're in New York running events for a New York audience, set it to Eastern Time. If you're running a virtual event for a global audience, pick the timezone you want to use as the "official" event time.
Always double-check your timezone before creating an event. An event accidentally set to the wrong timezone can confuse attendees and cause support headaches.
2. Tax & Fees — The Charges Beyond the Ticket Price
Where: Settings → Tax & Fees
Here's the reality: most ticketed events involve more than just the face value of the ticket. Depending on your location and event type, you may need to add taxes or additional fees. Tixmore lets you predefine these so they're automatically applied to every ticket you sell.
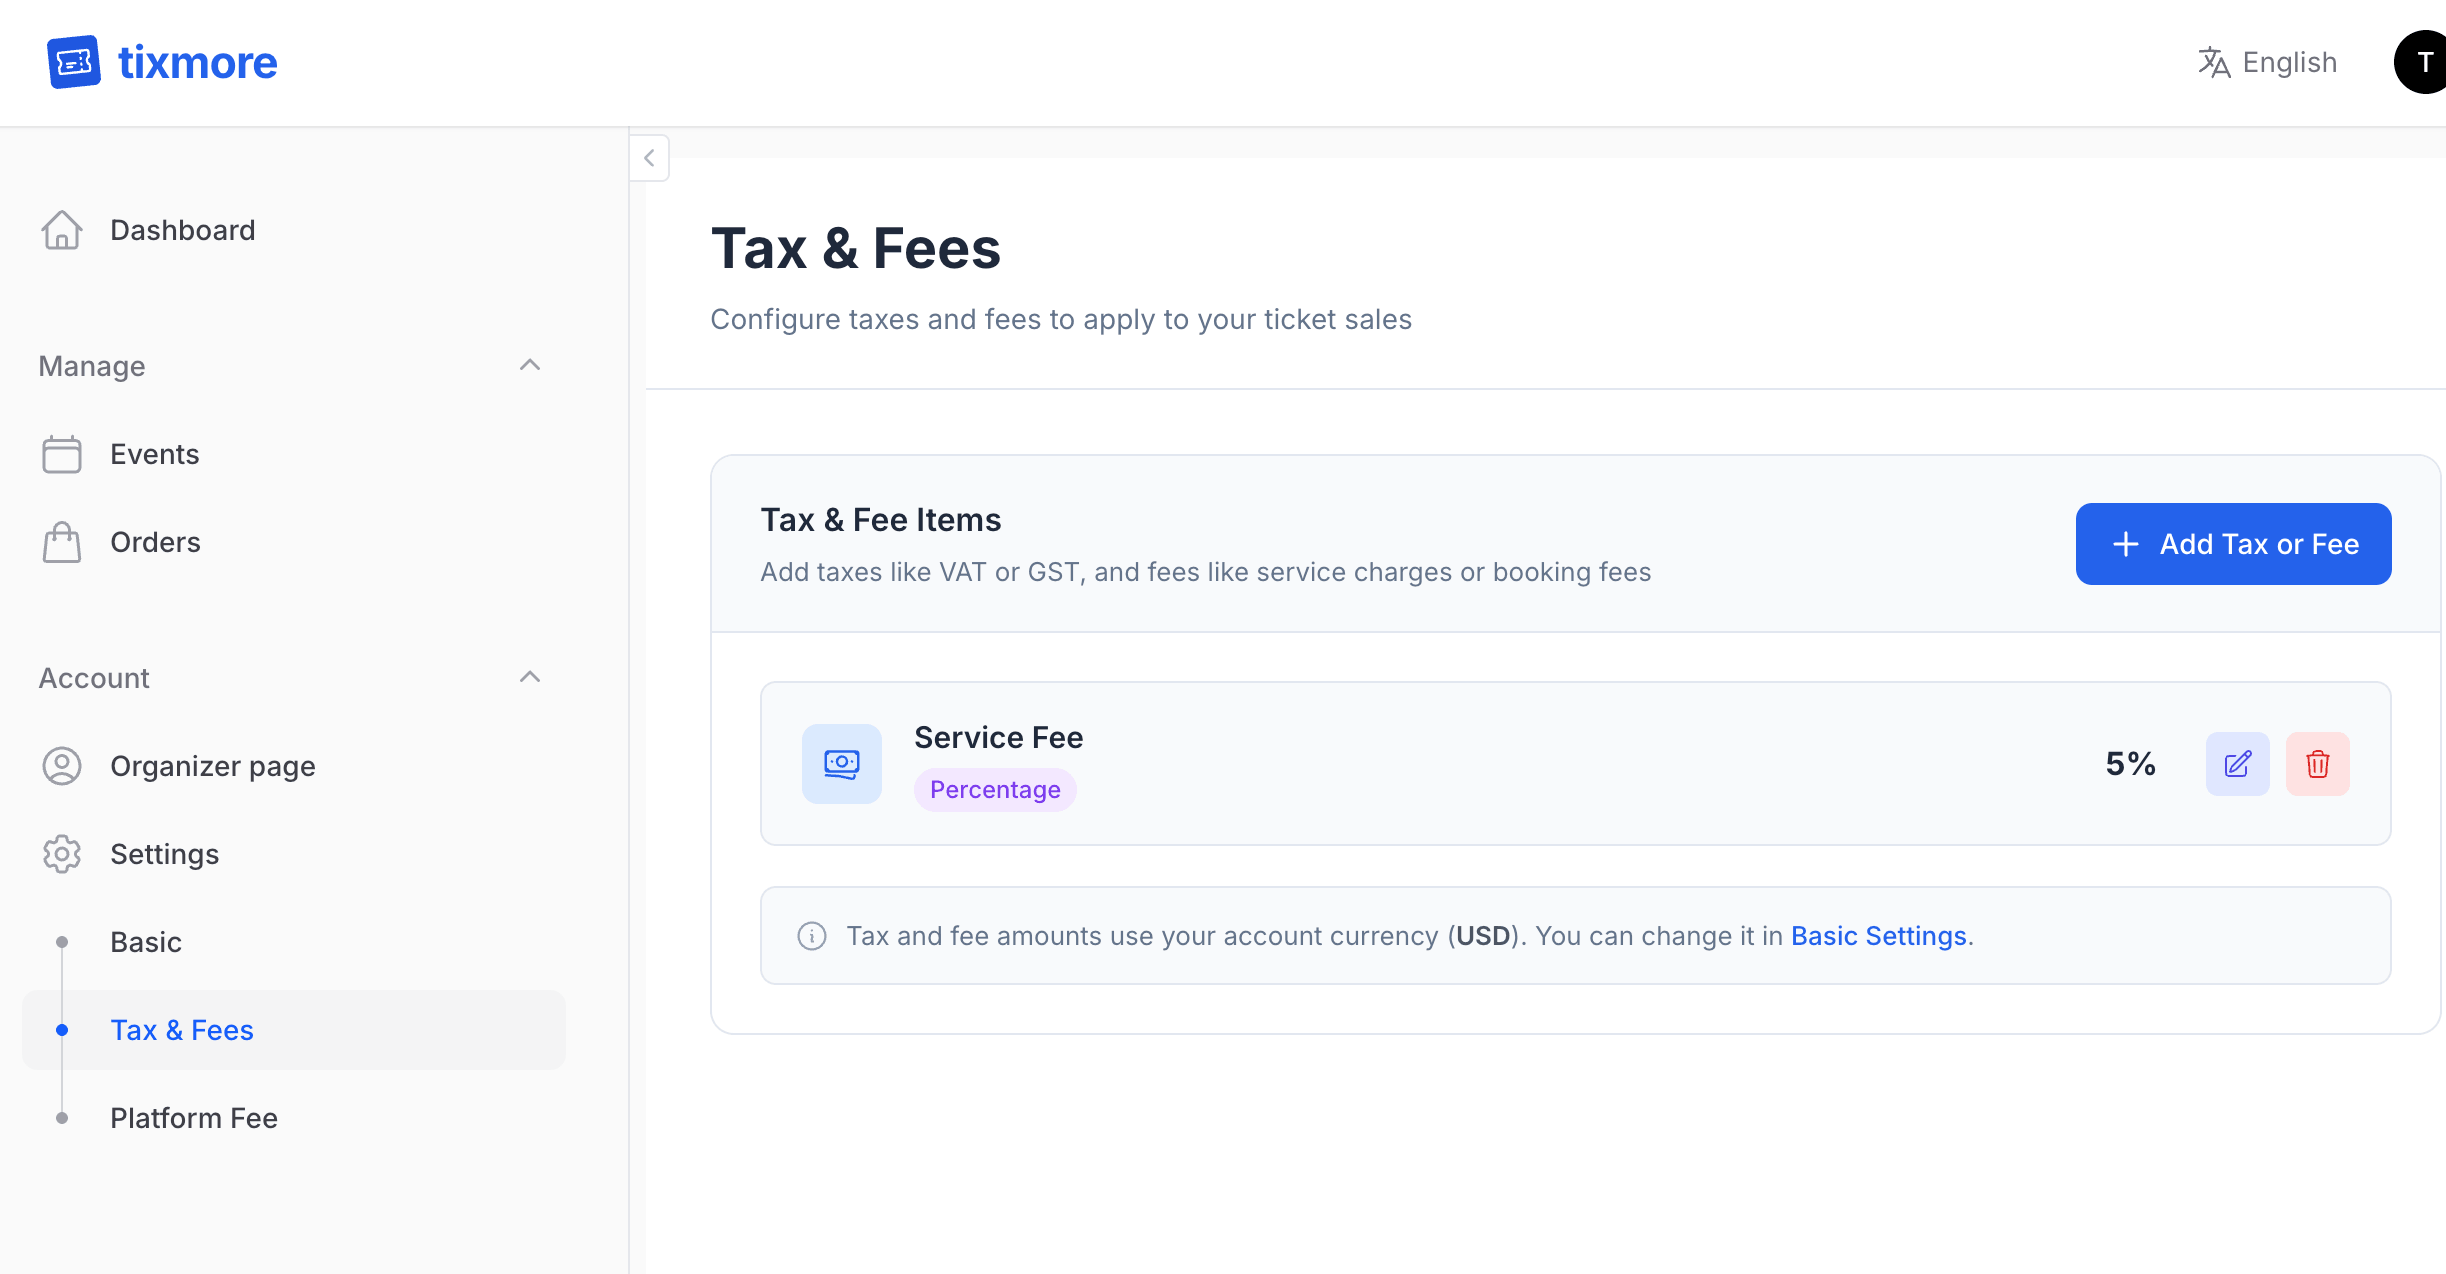
What kinds of charges might apply?
| Type | Examples | Who typically requires it |
|---|---|---|
| Government Tax | VAT, GST, Sales Tax, Entertainment Tax | Required by law in many countries |
| Service Fee / Booking Fee | Organizer's own processing fee | Common in the industry — covers your operational costs |
| Facility Fee | Venue surcharge | Venues that charge a per-ticket facility fee |
| Insurance Fee | Event cancellation insurance | Optional, but some organizers offer it |
How to add a Tax or Fee
Click "+ Add Tax or Fee" and you'll see this form:
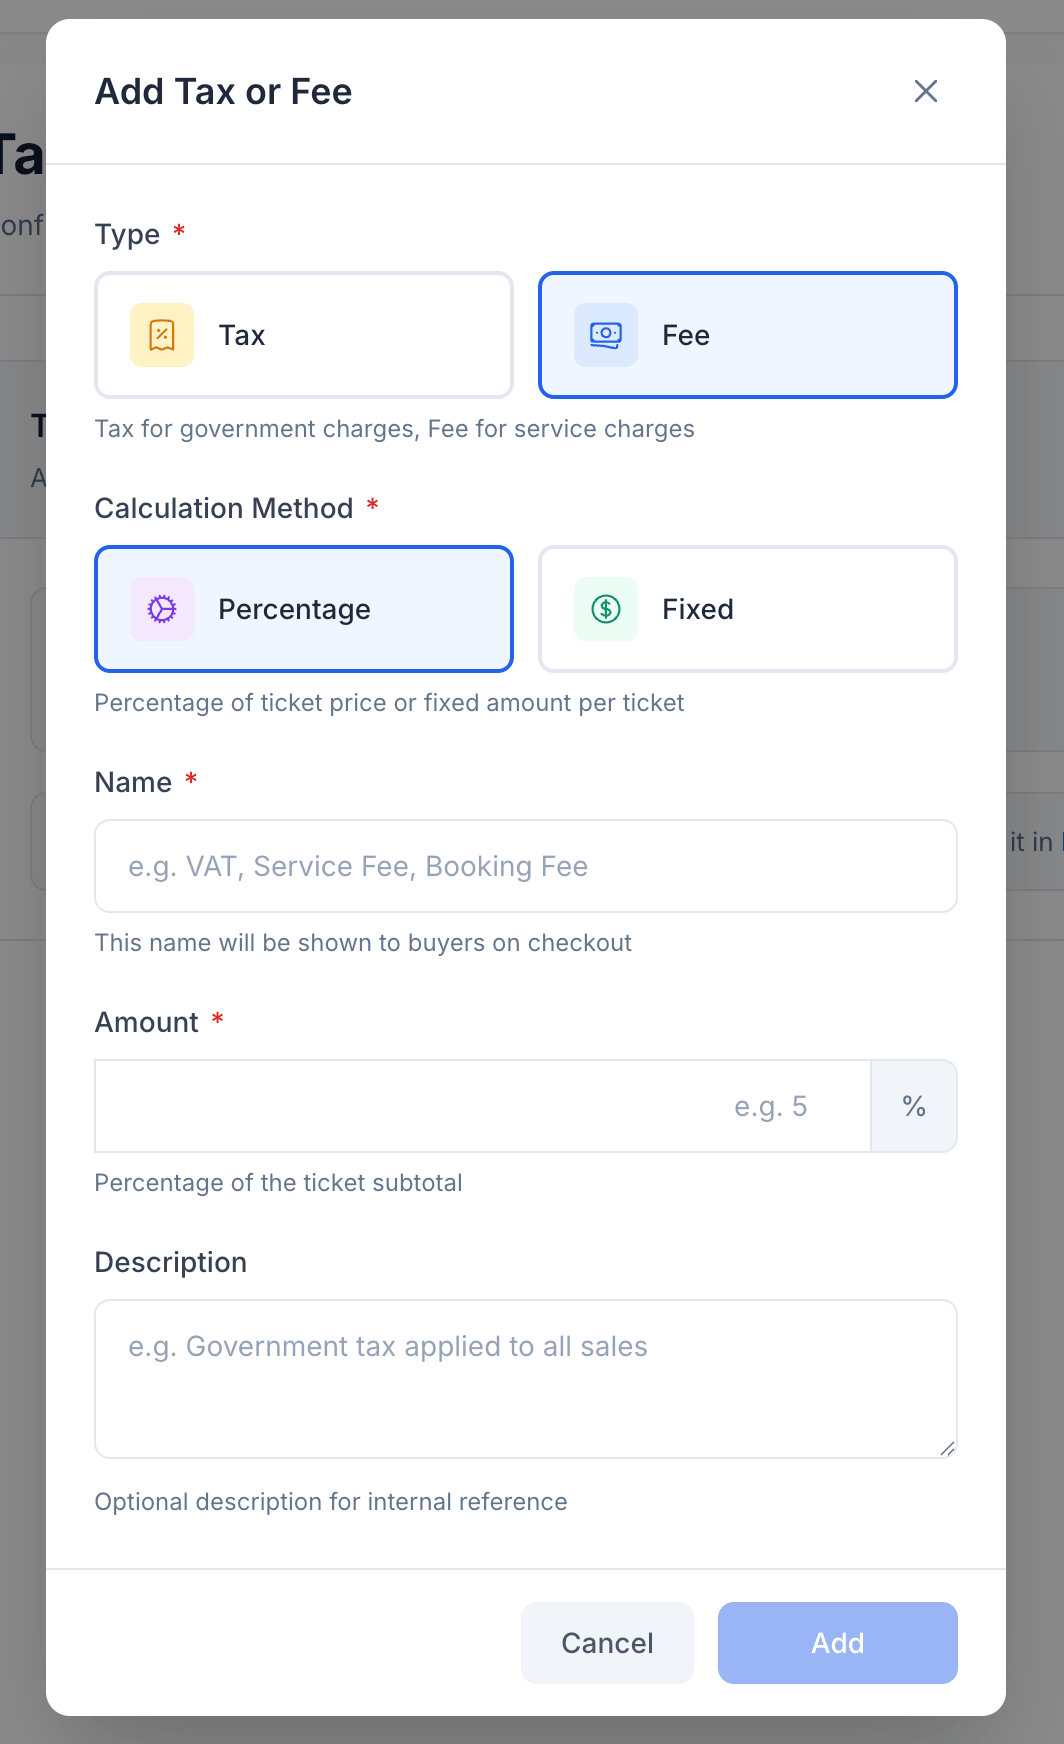
Here's what each field means:
-
Type: Choose Tax for government-mandated charges (like VAT or GST), or Fee for your own service charges (like a booking fee). The distinction matters — taxes are often displayed separately on receipts for compliance reasons.
-
Calculation Method:
- Percentage — A percentage of the ticket price (e.g., 10% VAT on a $50 ticket = $5)
- Fixed — A flat amount per ticket (e.g., $2 booking fee regardless of ticket price)
-
Name — This is what the buyer sees at checkout. Be transparent. "VAT 10%" or "Booking Fee" are clear. "Processing" is vague and can erode trust.
-
Amount — The actual percentage or fixed amount.
-
Description — Optional, for your own reference. Useful if you have multiple fee items and need to remember why each one exists.
Real-world examples
Here are some common setups we see organizers use:
Concert in Malaysia:
- GST (Tax, 8%, "SST")
Tech conference in the US:
- No tax needed (most states don't tax event tickets)
- Service Fee (Fee, Fixed, $2.00, "Booking Fee")
Festival in Europe:
- VAT (Tax, 20%, "VAT")
- Facility Fee (Fee, Fixed, €3.00, "Venue Fee")
Tax and fee items you create here become presets for your account. When you create a new ticket, you can choose which ones to apply. You don't have to apply all of them to every ticket — some tickets might have different tax treatments.
3. Platform Fee — Pass It or Absorb It?
Where: Settings → Platform Fee
Tixmore charges a small platform fee on each paid ticket sold. This is how we keep the lights on. The question is: who pays for it?
You have two options, and you can switch between them anytime.
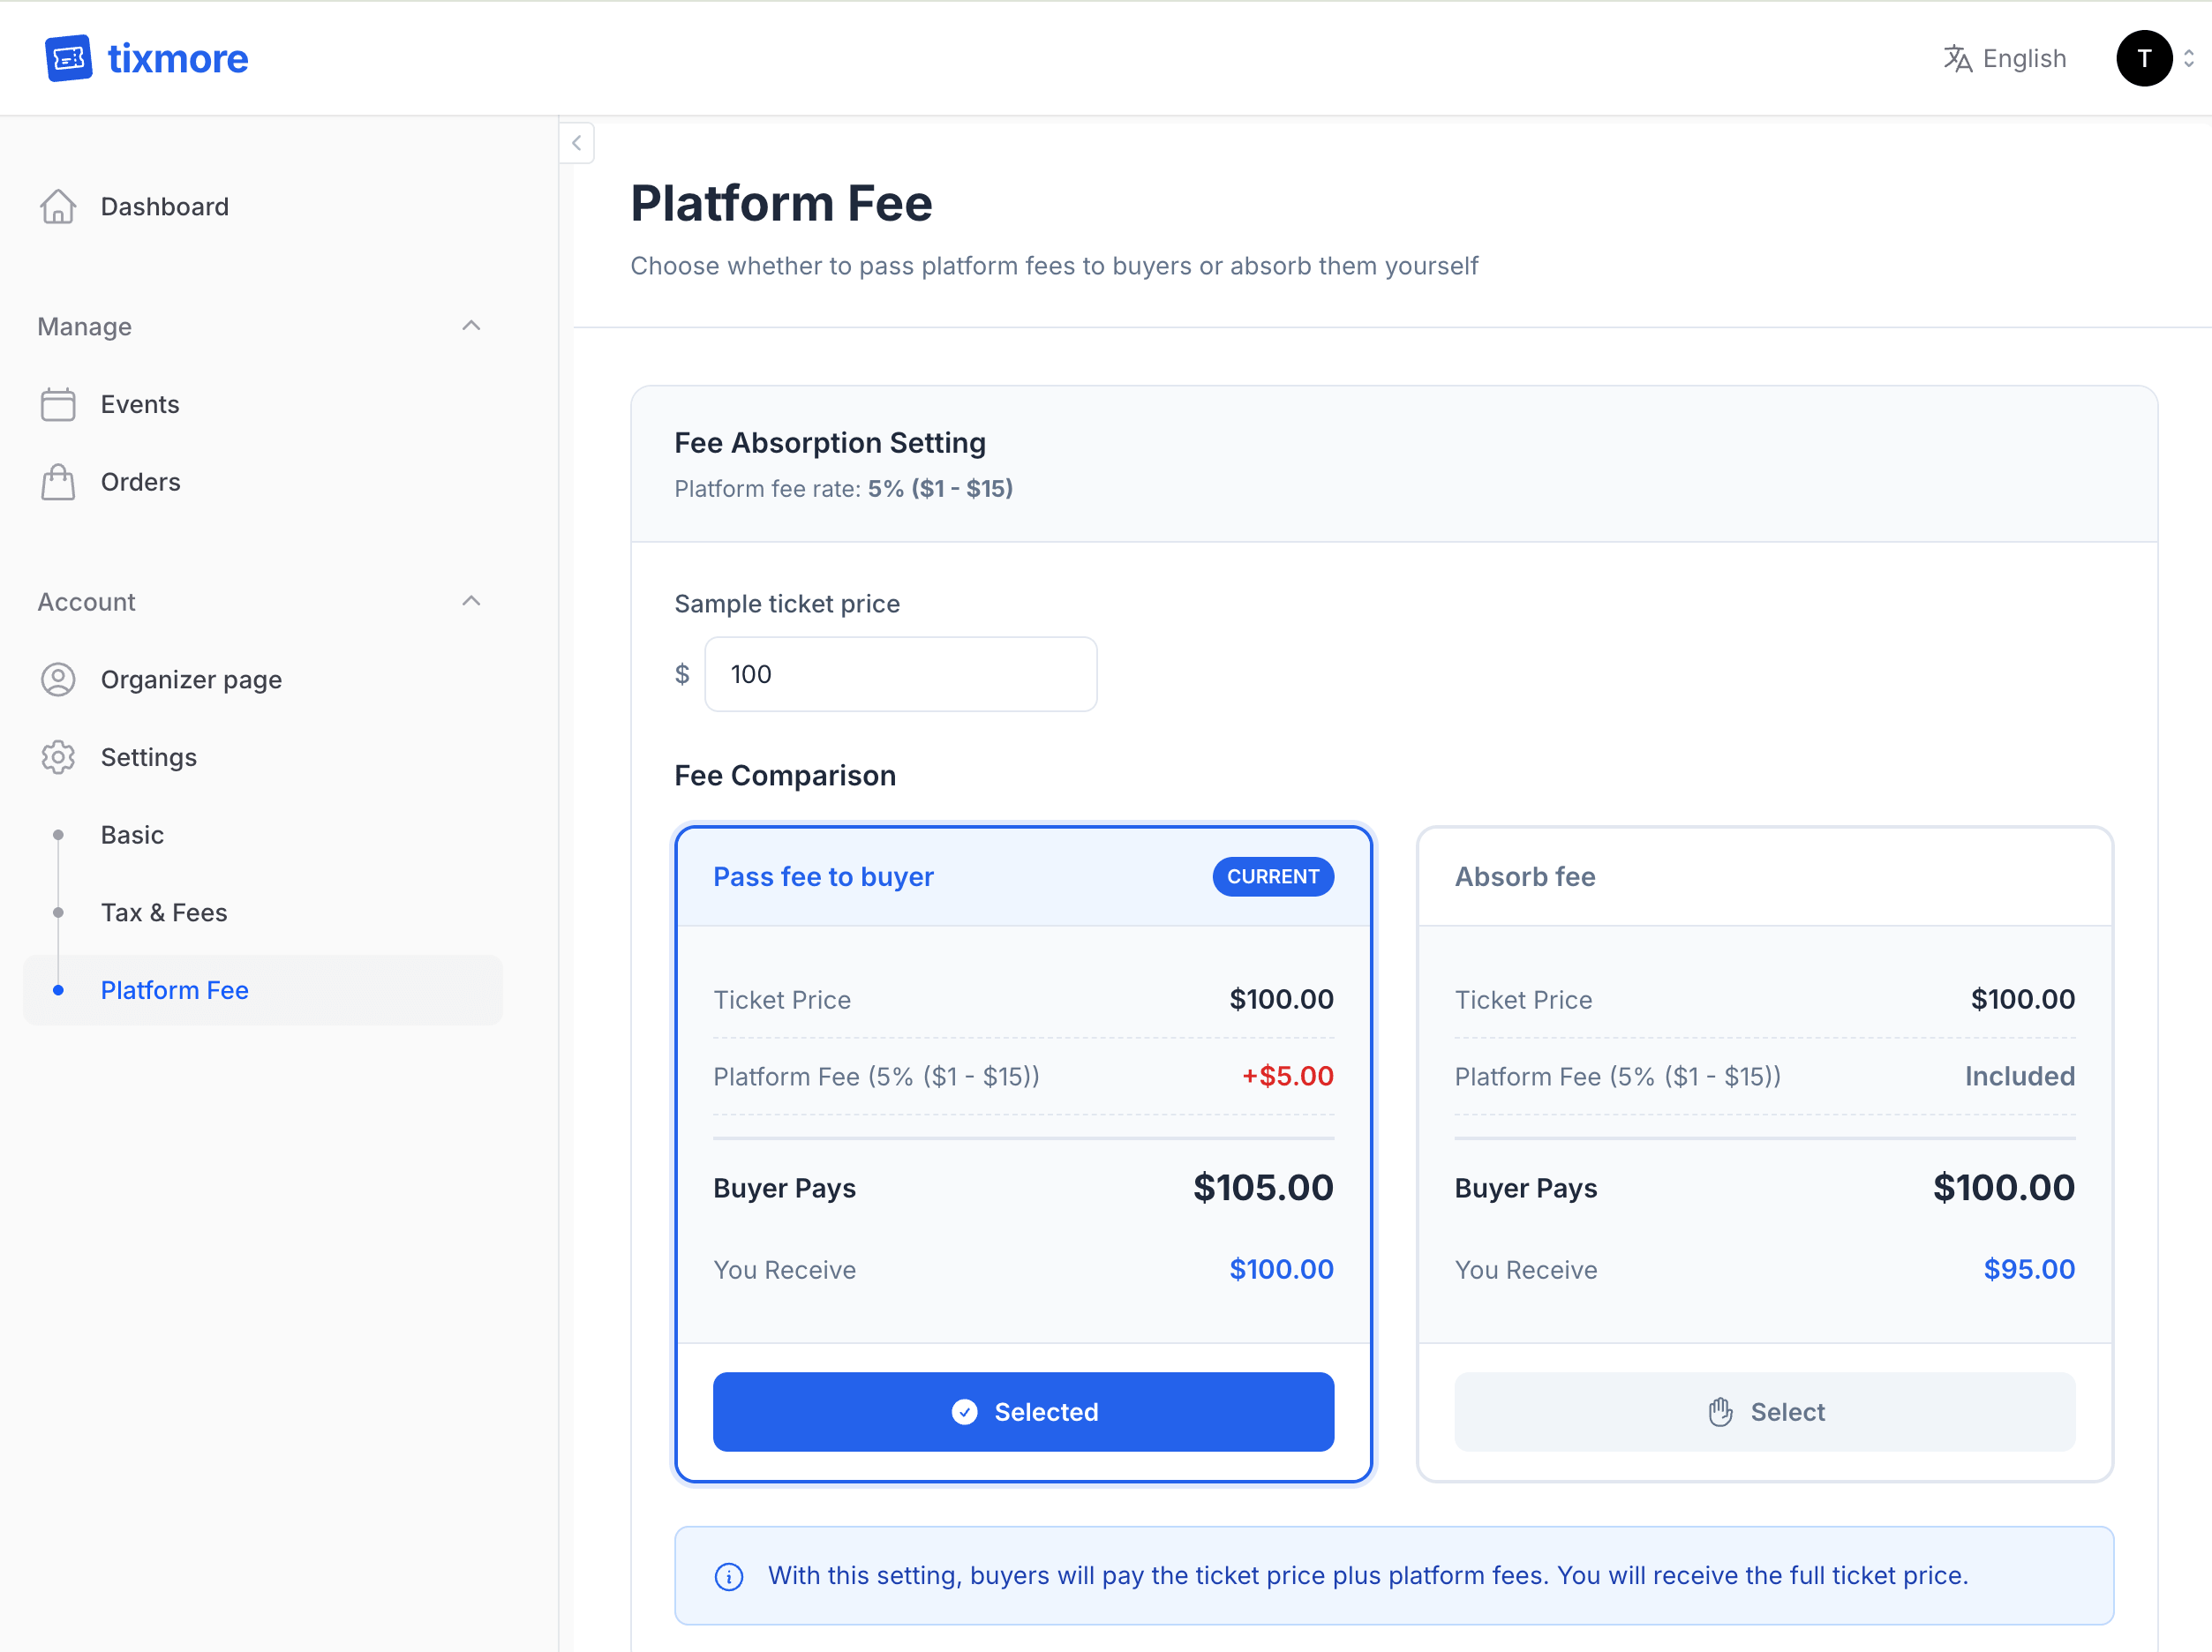
Option A: Pass fee to buyer (Default)
The buyer pays the ticket price plus the platform fee. You receive the full ticket face value.
Example with a $100 ticket:
- Buyer pays: $105.00 (ticket + platform fee)
- You receive: $100.00
When this makes sense:
- You want to receive the exact amount you set as the ticket price
- Your audience is used to seeing fees at checkout (this is the industry norm — Ticketmaster, Eventbrite, and most platforms do this)
- You're running a large-scale event where margins matter
Option B: Absorb the fee
The buyer pays exactly the ticket price — no extra fees at checkout. The platform fee is deducted from your earnings.
Example with a $100 ticket:
- Buyer pays: $100.00 (clean price)
- You receive: $95.00 (after platform fee)
When this makes sense:
- You want a premium, no-surprise checkout experience
- You're running a community event, workshop, or intimate gathering where buyer trust matters more than a few dollars
- Your ticket price already has enough margin to absorb the fee
- You're competing on price and want to advertise a clean, all-inclusive number
Our take
Most organizers on Tixmore choose Pass fee to buyer — it's the default for a reason. Buyers generally expect to see a small service fee at checkout, especially for paid events. It's transparent, it's standard, and it means you don't leave money on the table.
That said, Absorb fee can be a great differentiator if your event brand is all about simplicity and trust. Some of the most successful organizers we've seen use "all-inclusive pricing" as part of their brand identity.
The good news? You can switch between the two anytime. Try one, see how your audience reacts, and adjust.
4. Connect Stripe — So You Can Actually Get Paid
Where: Settings → Payment
This is the big one. Everything above controls how your tickets are priced — but none of it matters if you can't collect the money. Tixmore processes payments through Stripe, and until you connect a Stripe account, your event cannot take a single paid order.
Connecting is free and takes just a few minutes. You'll pick your country/region, sign in to Stripe (or create an account on the spot — no Stripe account needed beforehand), and verify your identity so payouts can reach your bank.
A published event with paid tickets but no connected Stripe account cannot accept payments. Set this up before you start selling.
👉 Follow the full walkthrough here: Connect Stripe to Get Paid — it covers every step with screenshots, plus what to do if Stripe asks for verification.
Quick Checklist
Before you create your first event, make sure you've:
- Set your currency to match your audience's payment region
- Set your timezone to match your event's location
- Added any taxes required by your local regulations (VAT, GST, etc.)
- Decided whether to add a service/booking fee for your own operations
- Chosen whether to pass or absorb the platform fee
- Connected Stripe so you can actually get paid (required for paid tickets)
Once these are in place, you're ready to create your first event. Head to Events → Create Event and let's go!
Have questions about these settings? Reach out to us at [email protected] — we're happy to help you get set up.