Tickets & Products
The Tickets & Products page is where you define everything attendees can purchase for your event. It's split into two tabs: Tickets (the main entry passes) and Products (add-ons like merchandise, food, parking, etc.).
Let's start with tickets.
Tickets
Tickets are the core of your event — they control who can attend, how many spots are available, and what people pay.
Creating a Ticket
Go to Tickets & Products → Tickets tab and click "+ Create Ticket".
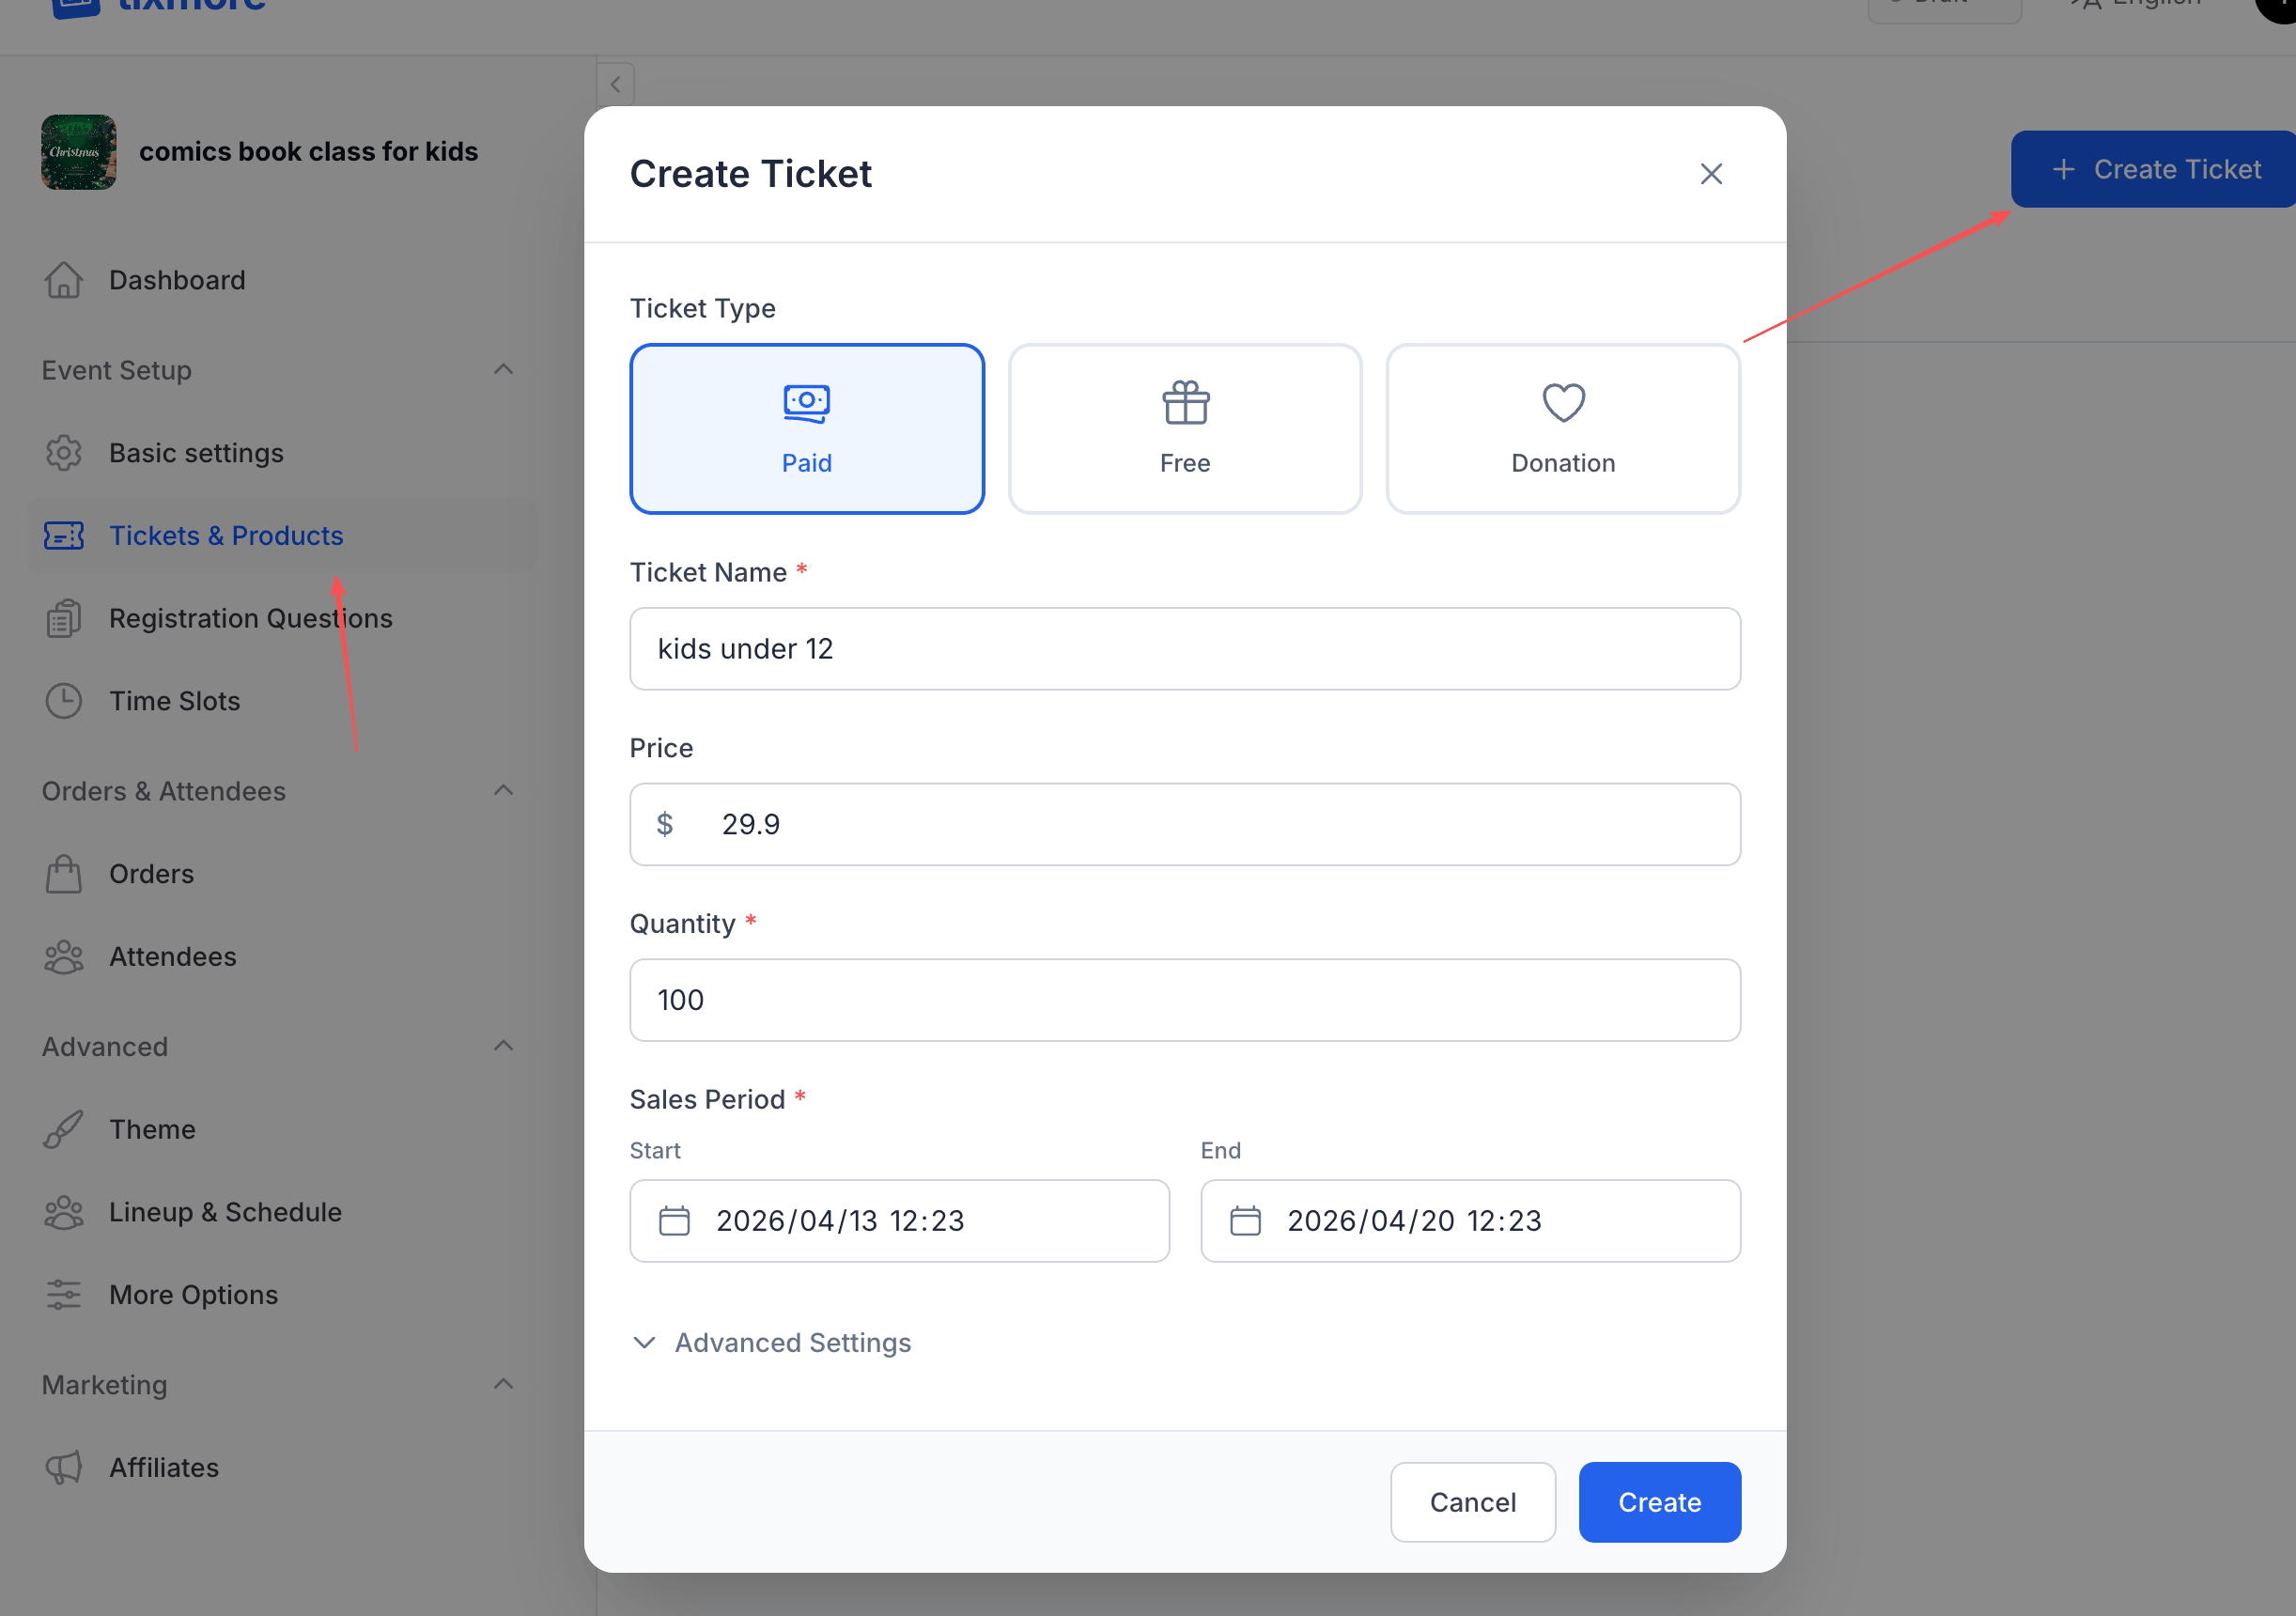
Ticket Type
Every ticket starts with choosing a type:
| Type | How it works | Best for |
|---|---|---|
| Paid | Attendee pays a fixed price you set | Concerts, conferences, workshops |
| Free | No charge — attendee just registers | Community meetups, open events, webinars |
| Donation | Attendee chooses how much to pay | Charity events, "pay what you can" |
Basic Fields
These fields are the same across all ticket types:
Ticket Name The label attendees see when selecting tickets. Be clear and specific:
- ✅ "General Admission", "VIP Pass", "Early Bird", "Student Ticket"
- ❌ "Ticket 1", "Option A"
Price (Paid tickets only) The face value in your account currency. This is what the attendee sees before any taxes or fees are added.
Quantity How many of this ticket type are available. Tixmore tracks inventory in real time — when they're gone, they're gone. Set this to the actual capacity you want to sell.
If you don't have a hard cap (e.g., a virtual event), you can set a very large number. But for physical venues, always set a realistic limit — overselling leads to angry attendees at the door.
Sales Period When ticket sales open and close. This gives you precise control over:
- Early bird windows — create a cheaper ticket that closes before the regular one opens
- Last-minute cutoffs — stop sales a few hours before the event starts
- Staggered releases — release VIP tickets first, then general admission
Advanced Settings
Expand "Advanced Settings" at the bottom to access additional options.
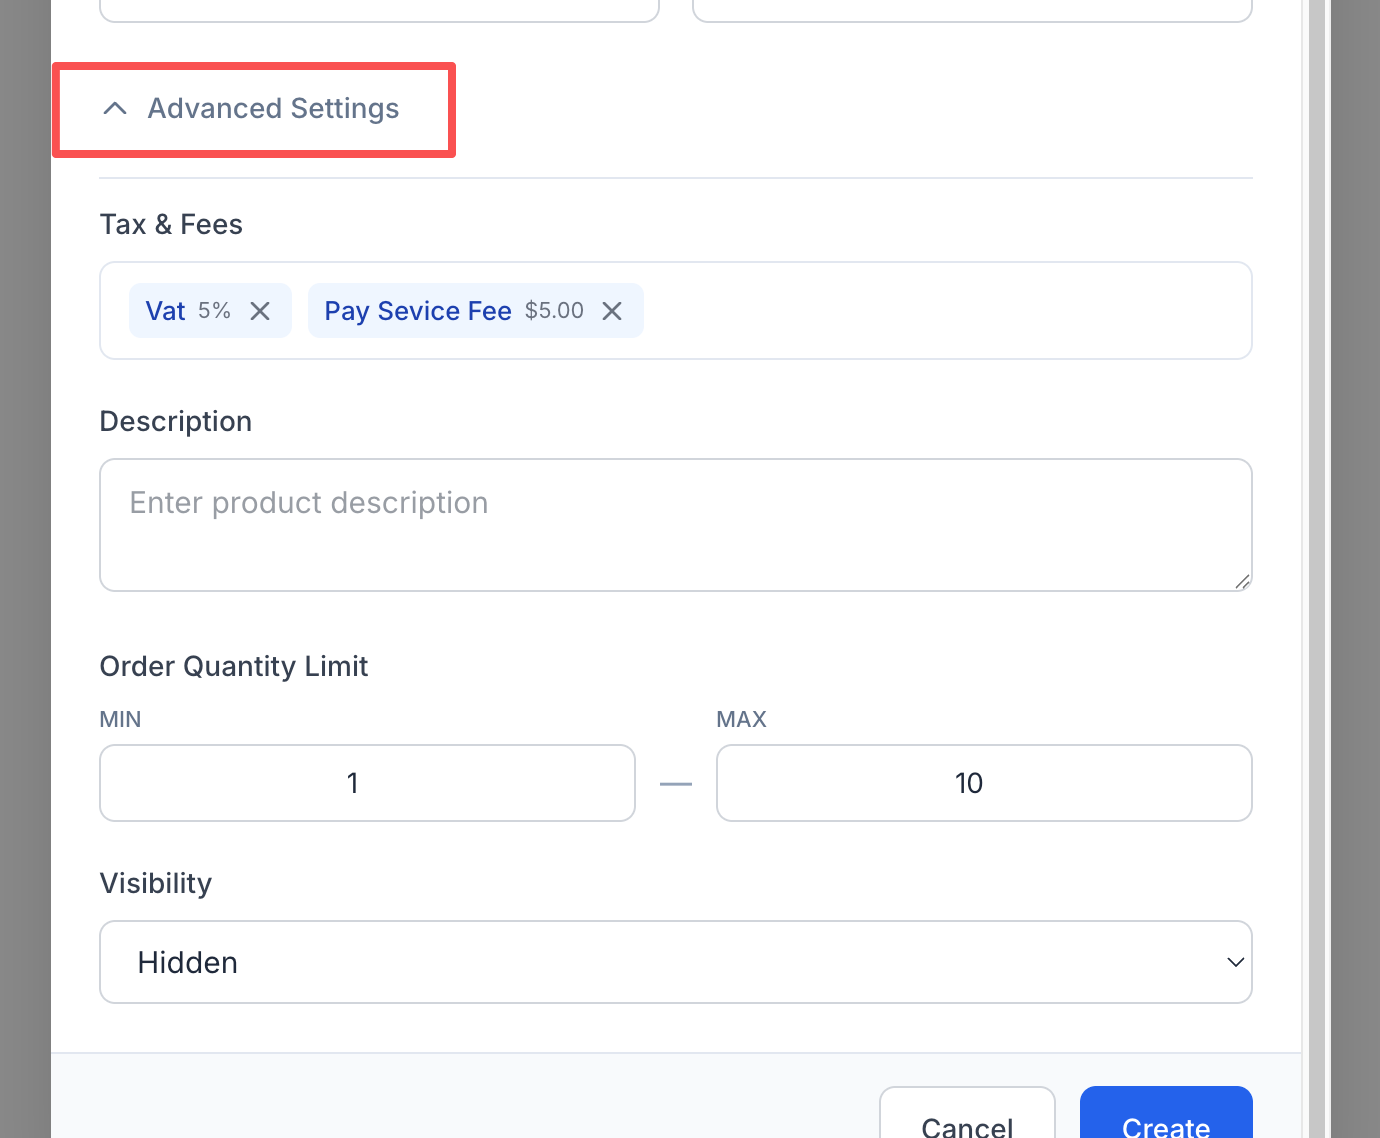
Tax & Fees If you've set up tax or fee presets in your account settings, they'll appear here as selectable tags. Click to attach them to this ticket. You can apply different taxes/fees to different ticket types — for example, a VIP ticket might include a facility fee while a general ticket doesn't.
Description An optional description shown to attendees. Useful for explaining what's included:
- "Includes access to all sessions and lunch"
- "Front row seating with meet-and-greet"
- "Ages 12 and under only"
Order Quantity Limit Control how many of this ticket type a single order can purchase:
- MIN — Minimum per order (default: 1). Set to 2 for "bring a friend" tickets.
- MAX — Maximum per order (default: 10). Prevents bulk buying or scalping.
Visibility Controls whether this ticket appears on your event page:
- Visible — Anyone can see and purchase it
- Hidden — The ticket exists but is not shown publicly. Useful for invite-only tiers or tickets you reveal later via a direct link
Multiple Ticket Types
Most events benefit from having more than one ticket type. Here are some common setups:
Simple event:
- General Admission (Paid, $25)
Tiered pricing:
- Early Bird (Paid, $20, sales close 2 weeks before event)
- General Admission (Paid, $30)
- VIP (Paid, $80, limited to 50)
Mixed free + paid:
- Free Entry (Free, unlimited)
- VIP Upgrade (Paid, $50, limited to 20)
Charity event:
- Suggested Donation (Donation)
- Patron Supporter (Paid, $100)
Tickets are displayed on your event page in the order you create them. You can drag to reorder them.
Products
Products are add-ons that attendees can purchase alongside their tickets — think merchandise, parking passes, meal packages, or anything else you want to sell.
Tickets = entry passes. An attendee must select at least one ticket to complete an order. Products = optional extras. They're shown alongside tickets at checkout but are never required.
Creating a Product
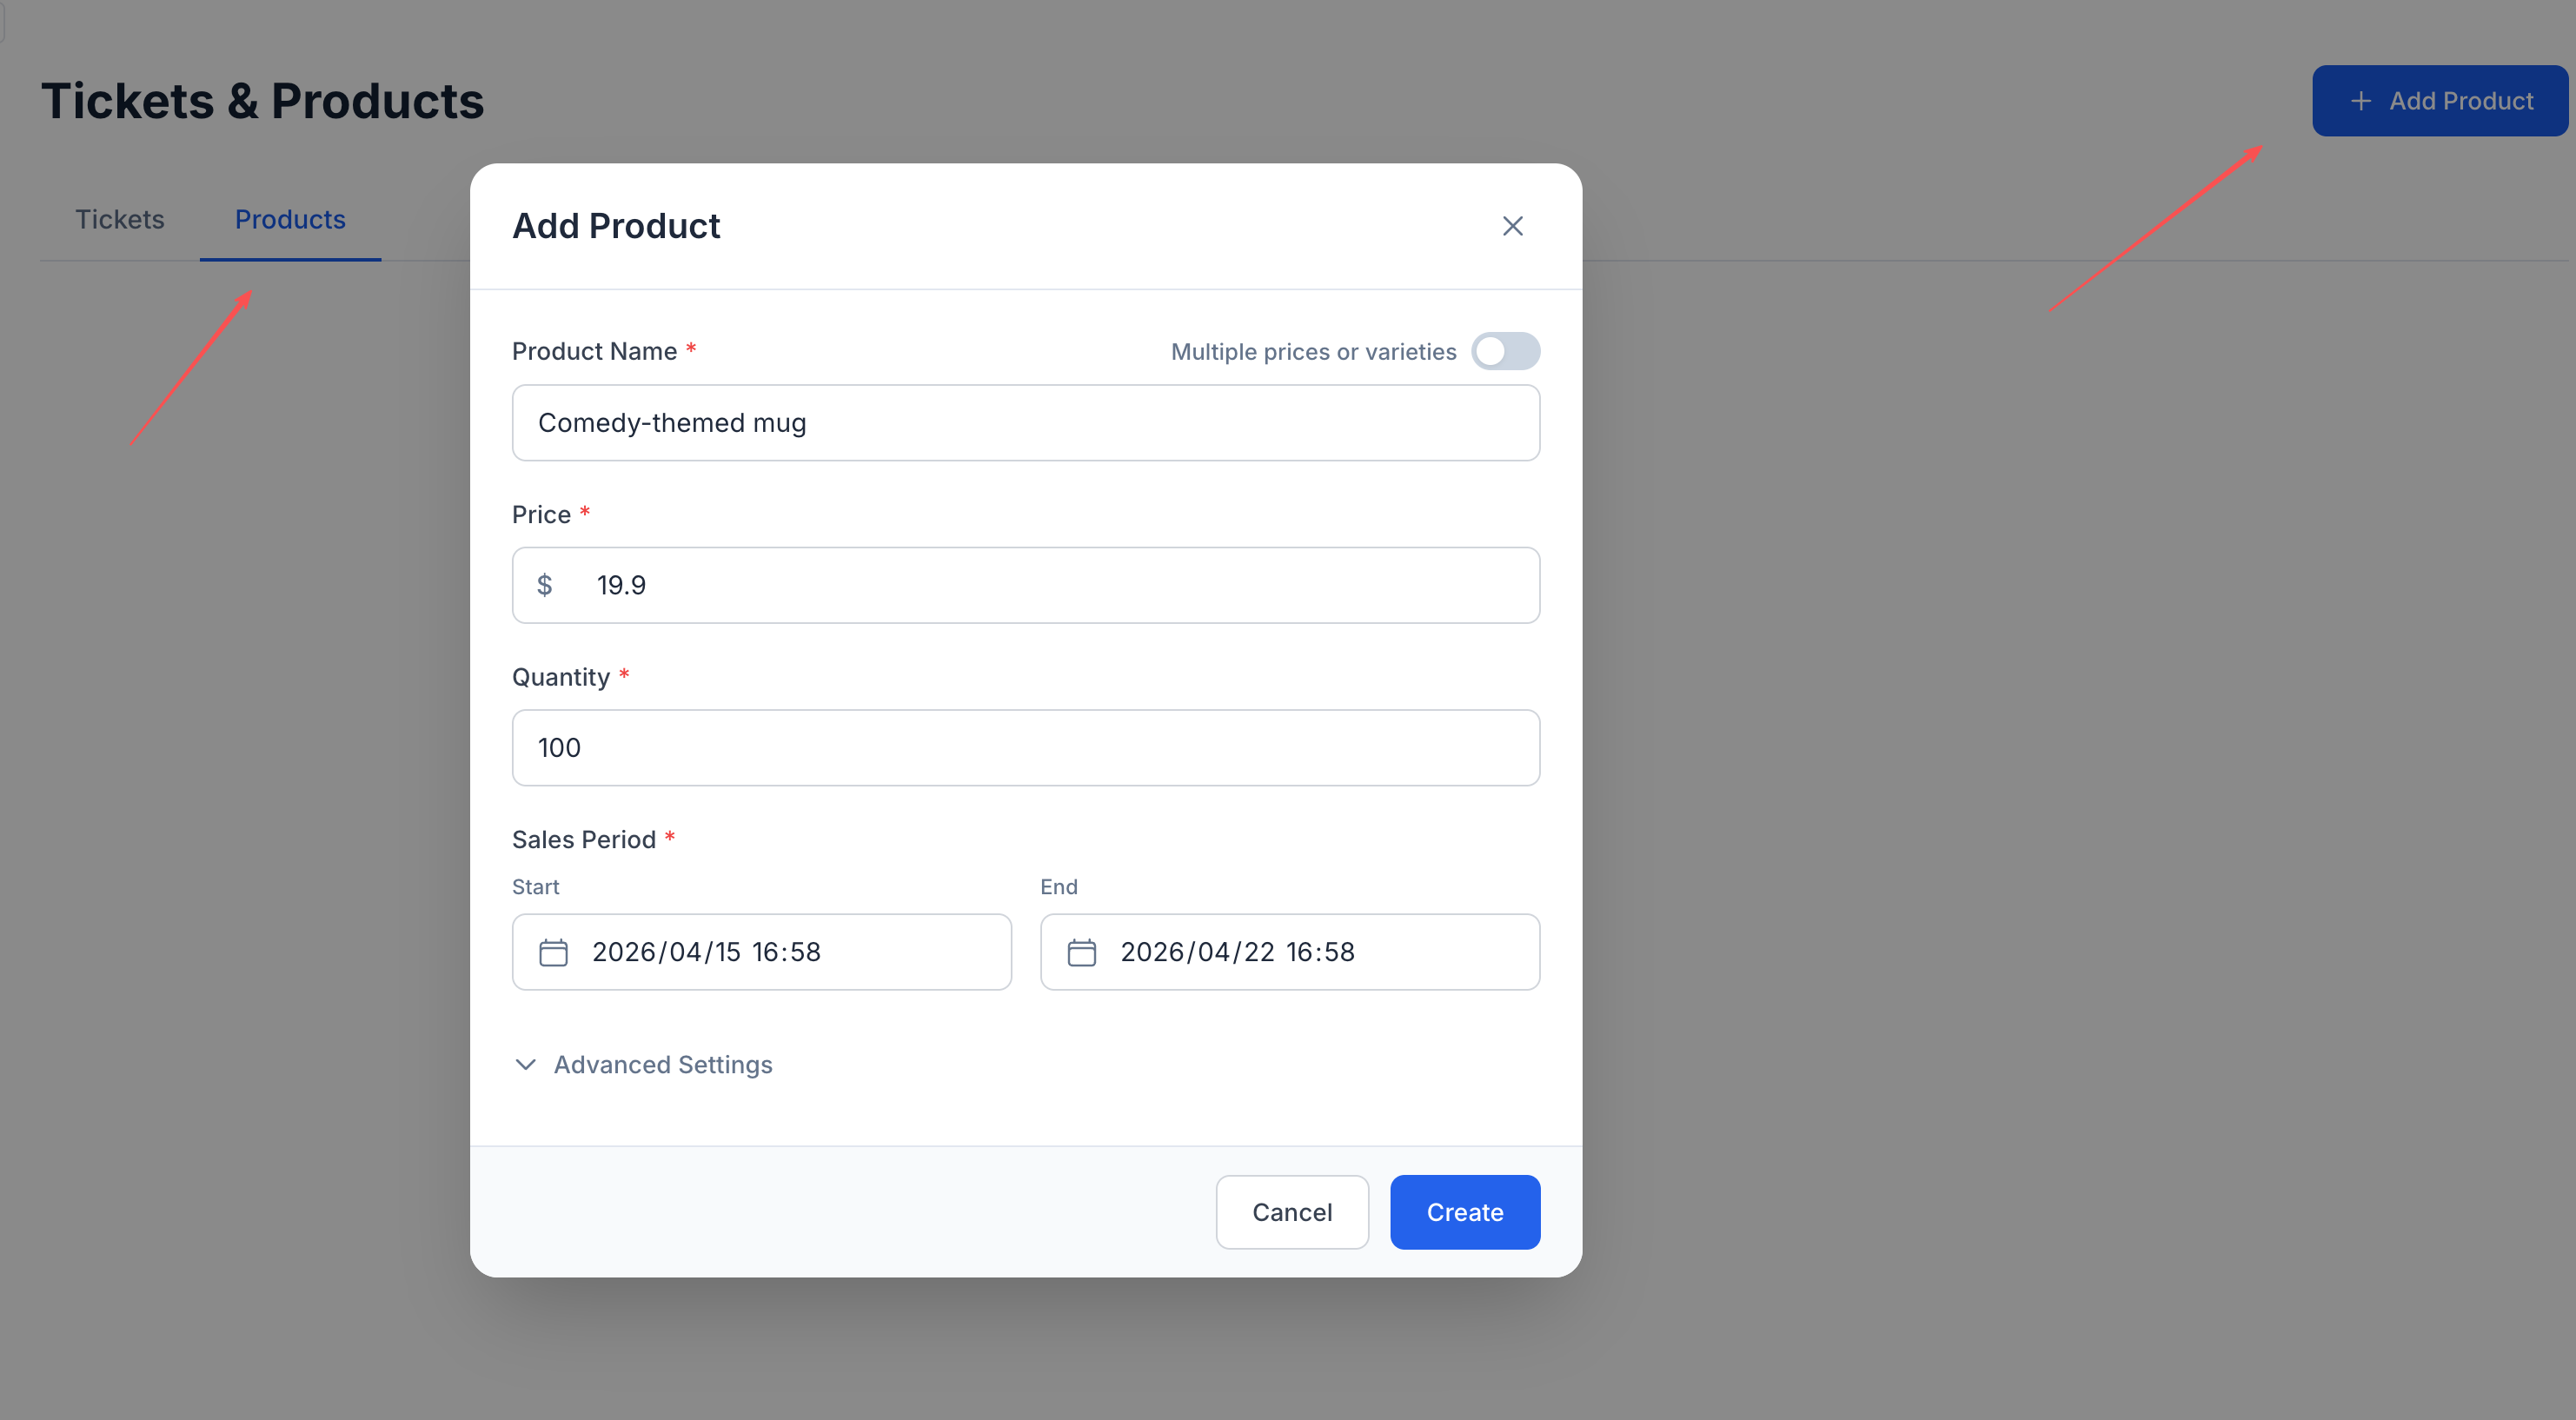
Switch to the Products tab and click "+ Add Product".
The basic fields are similar to tickets:
- Product Name — e.g., "Event T-Shirt", "Parking Pass", "Lunch Package"
- Price — fixed price per unit
- Quantity — total inventory available
- Sales Period — when this product is available for purchase
Products with Varieties
Here's where products get interesting. If your product comes in different options — sizes, colors, flavors — toggle on "Multiple prices or varieties".
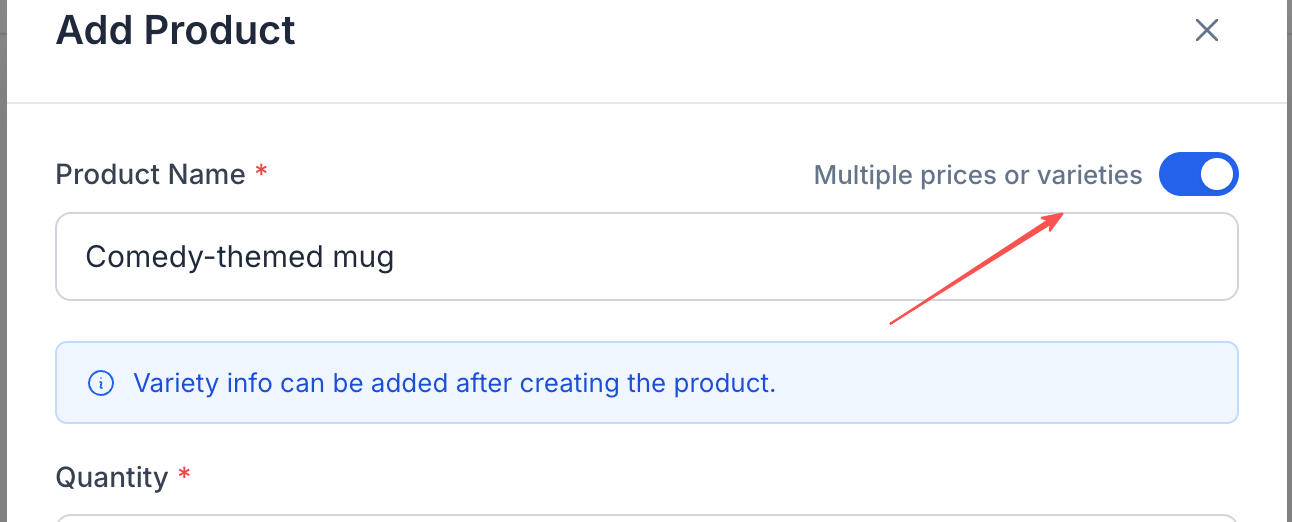
When you enable this, the Price field disappears from the creation form. Instead, you'll add varieties after creating the product — each with its own name, price, and inventory.
After creating the product, you'll see it listed with a "VARIETIES" badge. Click "+ Add Variety" to add each option.
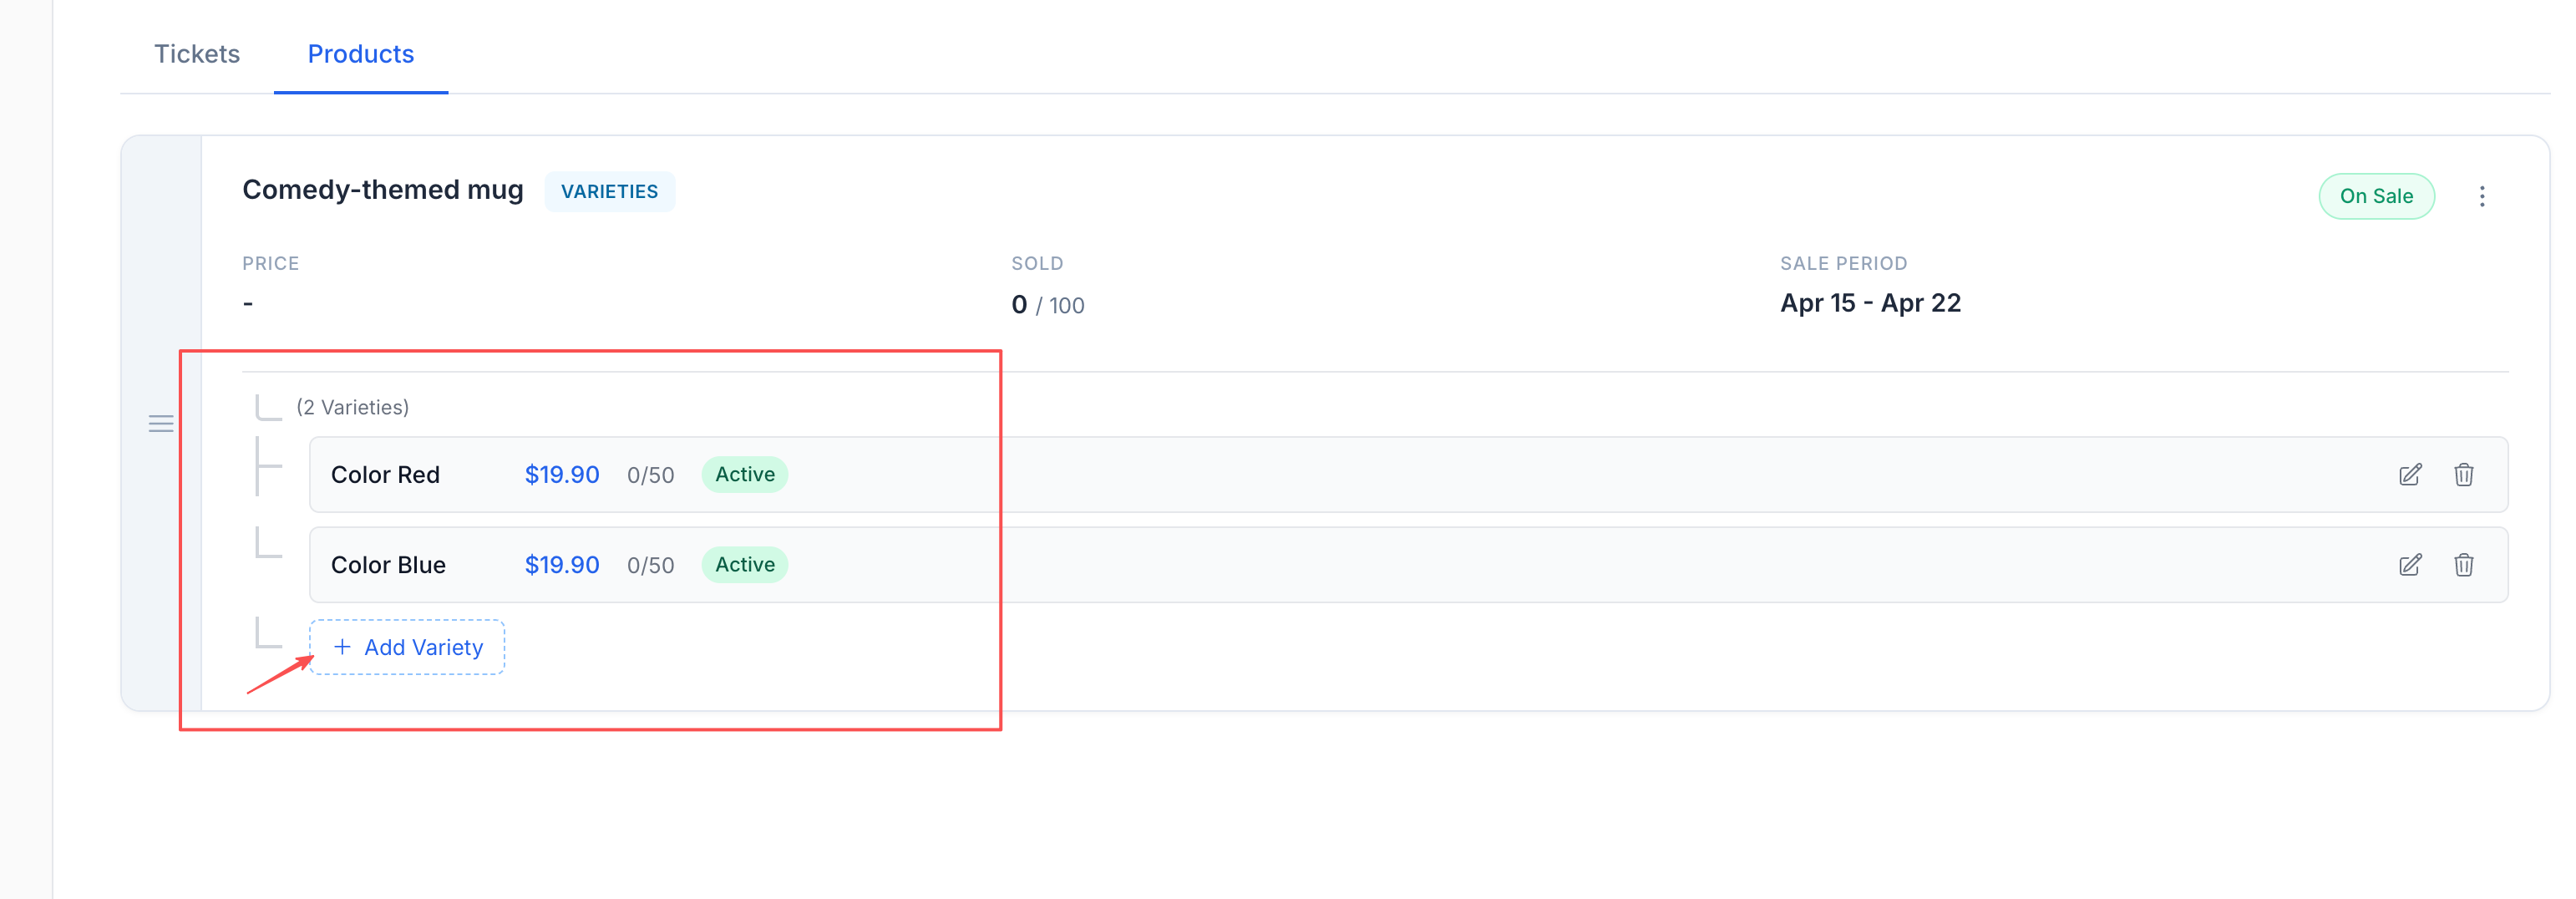
Example: Comedy-themed mug
- Color Red — $19.90 (50 in stock)
- Color Blue — $19.90 (50 in stock)
Each variety tracks its own inventory independently. When "Color Red" sells out, "Color Blue" is still available.
Common use cases for varieties:
- T-shirts with sizes (S, M, L, XL) — same or different prices
- Food packages (Regular, Vegetarian, Halal)
- Parking (Standard $10, Premium $20)
- Workshop materials (Digital $5, Printed $15)
Product Advanced Settings
Just like tickets, products have Advanced Settings with the same options:
- Tax & Fees — Attach your preset tax/fee items
- Description — What's included or what to expect
- Order Quantity Limit — MIN and MAX per order
- Visibility — Visible or Hidden
How It All Comes Together
At checkout, attendees see:
- Tickets — they must pick at least one
- Products — optional add-ons shown below the ticket selection
- Tax & Fees — itemized on the order summary (if applied)
- Platform fee — shown or absorbed based on your platform fee setting
The total is calculated automatically. Attendees see a clear, transparent breakdown before they pay.
Tips for Organizers
- Start simple. You can always add more ticket types or products later — even after the event is published.
- Use sales periods strategically. Early bird pricing creates urgency. Staggered releases build momentum.
- Set realistic quantities. It's better to sell out and create demand than to have a half-empty venue.
- Name things clearly. "VIP Package — Includes front row + backstage access" converts better than "Ticket B".
- Use Hidden visibility for tickets you want to share via direct link only — great for press passes, sponsor comps, or flash sales.
Next up: learn how to customize your event page with themes and branding, or set up time slots for multi-session events — guides coming soon.